Mac Live Captions Not Working: No Setting, No Text, Hidden Window
Check Apple silicon, supported languages, the first download, and Computer Audio versus Microphone before you replace Live Captions on your Mac.
Summary
- Live Captions works only on Apple silicon Macs, and only in some languages and regions.
- The first time you turn it on, the Mac downloads language data, so do it while you're online.
- Pick Computer Audio for a podcast or video playing on the Mac, and Microphone for people near you.
- If the window keeps vanishing, choose Keep Onscreen and check that captioning isn't paused.
We make Vocena. The steps below come from Apple's Mac User Guide, its macOS feature-availability page and the Podcasts guide for Mac, read on October 1, 2026. We didn't reproduce these failures on a Mac for this article.
On this page
No Live Captions option in Settings
Apple's Live Captions guide for Mac says the feature is available only on Macs with Apple silicon, and not in all languages, countries or regions. An Intel Mac doesn't support Apple's Live Captions, and giving a browser more permissions won't change that. Use the transcript or subtitles the publisher provides instead, and read another app's own requirements before you rely on it.
To see which spoken languages Live Captions supports, check the Accessibility: Live Captions row on Apple's macOS 27 feature availability page, not the lists for Dictation or Live Translation. On October 1, 2026, it listed the languages below; for an older macOS, check that version's own list.
| Language | Listed variants |
|---|---|
| Cantonese | China mainland; Hong Kong |
| English | Australia; Canada; India; Singapore; United Kingdom; United States |
| French | Canada; France |
| German | Germany |
| Japanese | Japanese |
| Korean | Korean |
| Mandarin Chinese | China mainland; Taiwan |
| Spanish | Mexico; Spain; United States |
If you're following an older tutorial, compare its macOS version with yours before you go looking for a menu it shows.

Turned on, but setup never finishes
Apple's Live Captions guide for Mac gives the steps: choose Apple menu → System Settings, click Accessibility in the sidebar (you may need to scroll down), then click Live Captions and turn it on. The first time, the Mac downloads language data, which needs an internet connection; after that, Apple processes the audio on the Mac. If setup looks stuck, check the connection and let the download finish before you test anything else.
The window disappears or stays empty
Apple's Live Captions guide for Mac says the window hides whenever no audio is detected. While you troubleshoot, click the Live Captions icon in the menu bar and choose Keep Onscreen, so you can watch the window as you start and stop your sample.
Then check that captioning isn't paused. The same guide says the Pause button in the window pauses it, and so does Stop Live Captions in the menu bar icon. Neither turns the feature off in Settings, so the window can be visible and still write nothing. Click Play in the window, or choose Start Live Captions, to resume.
If the window is somewhere you can't find, choose Restore Default Position from the same menu. You can drag and resize it, and change the font, size, text color and background color in Live Captions settings.
The Type to Speak field in the window does the opposite job: it reads what you type out loud during a conversation. It doesn't choose what gets captioned.
Test Computer Audio and Microphone separately
Live Captions has two sources. Computer Audio captions sound coming out of the Mac, such as a podcast or video. Microphone captions people talking near it. Apple's guide to changing what audio Live Captions uses describes two switches: the microphone icon in the top-right corner of the window, or Computer Audio and Microphone in the menu bar icon. Apple says Live Captions transcribes audio from all apps by default, but you may have switched to Microphone for a conversation and forgotten.
Use a short recording of your own voice, or one you're allowed to play, and change one thing at a time.
For the player:
- Choose Keep Onscreen so the window stays visible.
- Choose Computer Audio.
- If captioning is stopped, start it again.
- Play the sample and make sure it's actually playing speech.
- Note whether new text appears, the window stays empty, or the words are wrong.
If the sample works but the content you started with doesn't, keep the source the same and try that content again. A failure with only one player tells you where to look next. It doesn't prove the player blocks capture.
For the microphone, stop the player first, switch to Microphone and say a short sentence. If the recording keeps playing through the speakers, the microphone may hear it, and you won't know which source worked.
| Computer Audio | Microphone | What to check next |
|---|---|---|
| Text appears | Text appears | Try the original content again, changing only the player or passage |
| Empty | Text appears | The player and its playback; try an allowed sample in another player |
| Text appears | Empty | The selected microphone and whether sound reaches it |
| Empty | Empty | Apple silicon, the language, the first download, pause and Keep Onscreen |
| Wrong words | Either | The spoken language and how clear the audio is |
Write down each attempt: the source, player, output device, language and result. If you switch from built-in speakers to headphones, count that as a new attempt.
Apple's guide also says the accuracy of Live Captions may vary and that it shouldn't be relied on in high-risk or emergency situations. If text appears but the words are wrong, start with clear speech in one listed language, and test a mixed-language passage on its own.
Video subtitles and closed captions
If a video includes subtitles or closed captions, you pick them in its player. Apple's page on subtitles and closed captions on Mac puts the preferences in System Settings → Accessibility → Hearing → Subtitles and Captioning. It also describes generated subtitles for videos that don't include them, in supported apps, on macOS 27 or later with a Mac with M1 or later, in English (U.S. and Canada).
For a podcast, look for the transcript first
In Apple Podcasts on Mac, an episode with a transcript opens from View Transcript. Apple's guide to episode transcripts in Podcasts on Mac describes searching the text and clicking a paragraph to play from there. Not every episode has one; it depends on the language, country and region. To find a phrase you missed, search the transcript for a word you remember and click that paragraph to hear it again. Our Mac podcast guide covers transcripts, Live Captions and transcribing an audio file.
Vocena
Vocena for Mac needs macOS 15.5 or later; the iPhone and iPad app needs iOS or iPadOS 26 or later. On a Mac it captions the Mac's system audio and shows the captions in a floating desktop window. Live captions are free, with no time limit and no sign-in. Speech is recognized on the Mac; cloud recognition comes with the subscription and uploads the audio. Signing in and downloading models still need a connection.
Translation and transcribing imported audio are paid. Live captions mark each line as microphone or system audio, not by person. With the Qwen local model, the transcript of an imported recording is split by speaker; Apple's speech recognition doesn't split speakers. If all you need is a caption window you can read, the free captions are enough.
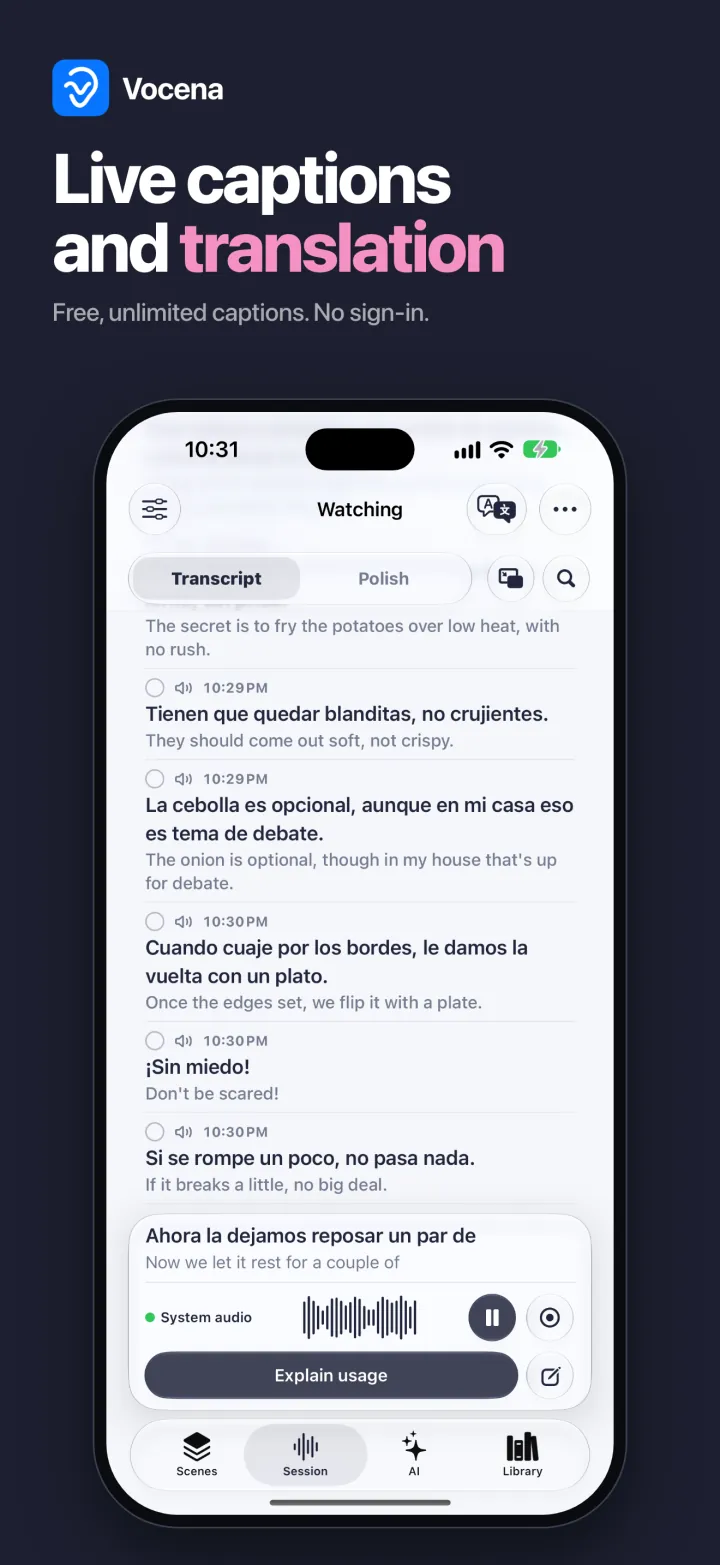
This picture is from the iPhone app, with demo data. On an iPhone, captions of other apps' audio need a physical iPhone running iOS 27; on a Mac the same captions appear in a floating desktop window. The translations shown are a paid feature.
Before an important session, play a short clip you're allowed to use in the player you'll use, and check that Vocena shows captions for it.
Contact Apple with your test notes
If both sources stay empty after these checks, stop repeating the same switches. Take your notes, with the Mac model, macOS version and the results of the Computer Audio and Microphone checks, to Apple. Apple's Accessibility Support page lists ways to contact Apple about accessibility features by phone, chat, in person or online, including SignTime with a sign language interpreter. Ask what else they need before you share any recording, and keep private audio out of it.
Sources and checks
- Get captions of spoken and computer audio on Mac Checked
- macOS Golden Gate - Feature Availability Checked
- Read episode transcripts in Podcasts on Mac Checked
- Use subtitles and closed captions on Mac Checked
- Apple Accessibility Support Checked
Device testing
We have not tested these steps on a device. This guide is based on official documentation and Vocena's product information.